Use Case: Single Cell
This section describes the cubi-tk use case for the analysis of single cell data. It provides an outline of how cubi-tk helps in connecting
Sea-Snap (the CUBI pipeline for the processing of RNA sequencing, including scRNA-seq),
SODAR (the CUBI system for meta and mass data storage and management).
Overview
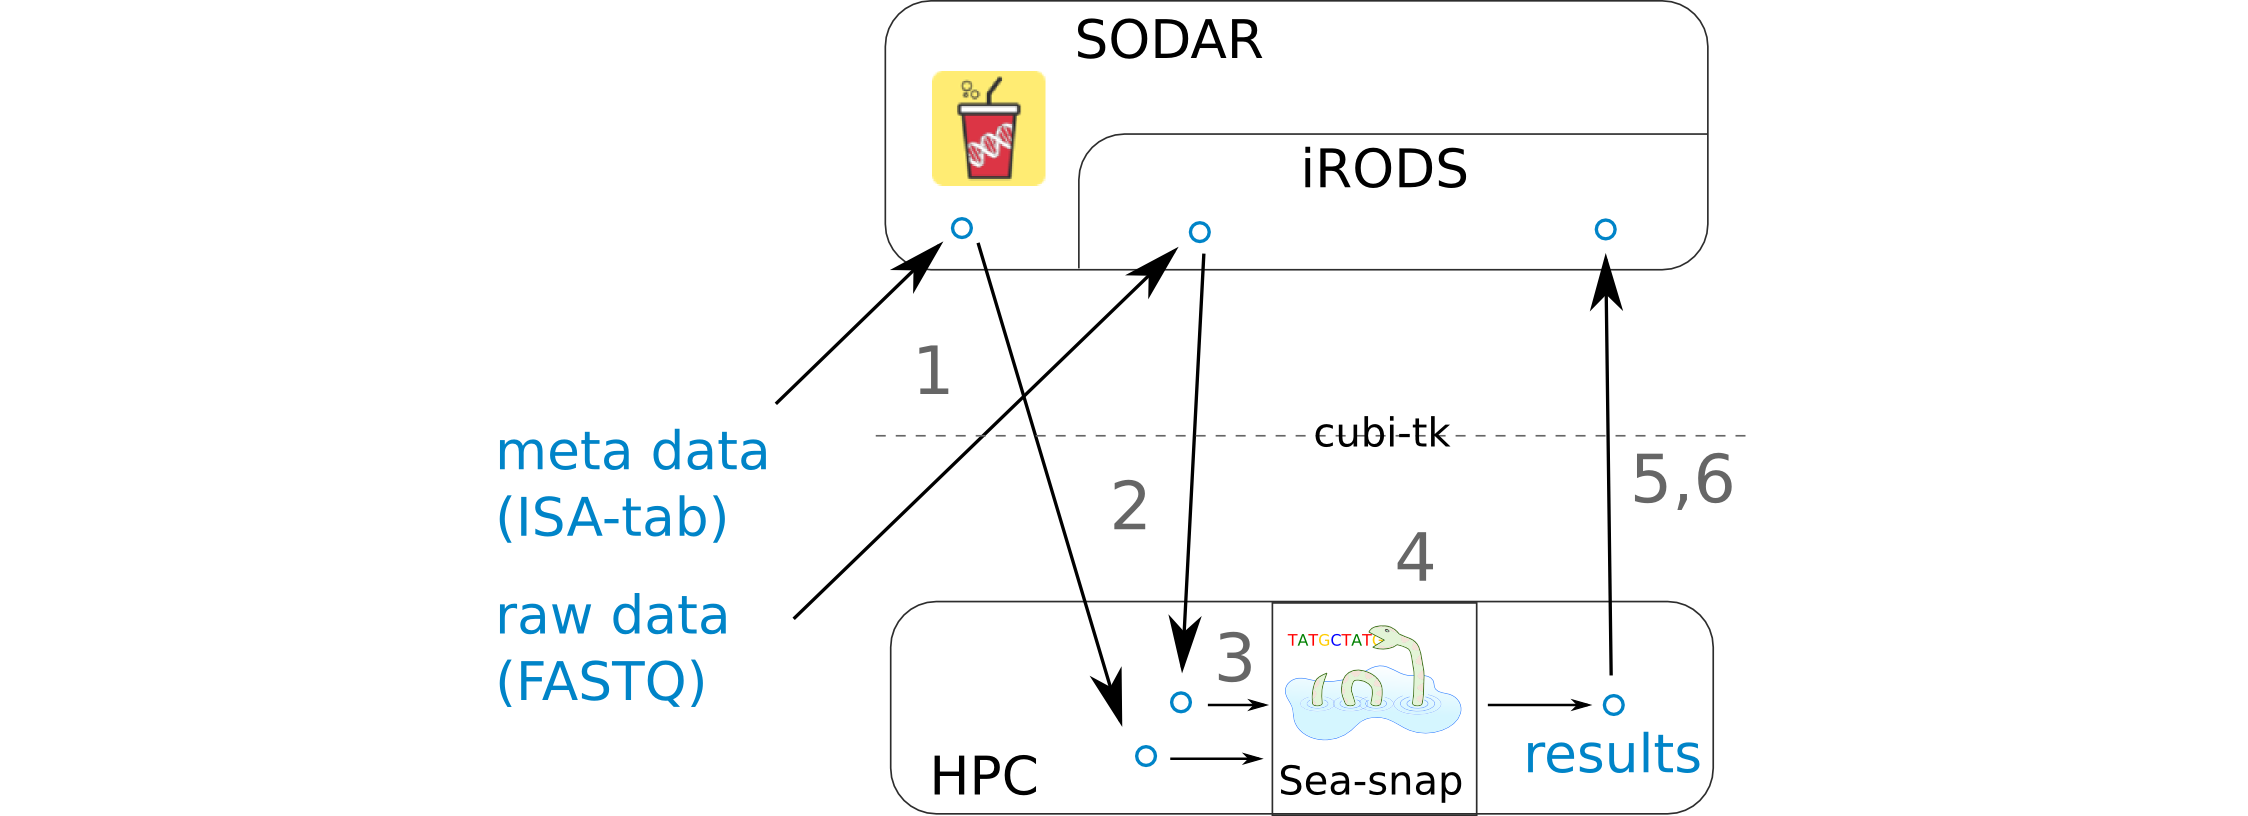
- 1 FASTQ and ISA-tab files are uploaded to SODAR.
ISA-tab files can be created with the help of
cubi-tk isa-tpl isatab-single_cell.FASTQ files can be uploaded with the help of
cubi-tk sodar ingest-fastq
- 2 FASTQ and ISA-tab files are pulled from SODAR.
FASTQ files can be downloaded using
cubi-tk sodar pull-raw-dataor iRods icommands.ISA-tab files can be downloaded using
cubi-tk sea-snap pull-isa.
- 3 A results folder is created on the HPC cluster and the config files are edited. A sample info file is created.
A results folder can be created with
cubi-tk sea-snap working-dir.The sample_info.yaml file can be created with
cubi-tk sea-snap write-sample-info. This combines information from the parsed FASTQ folder structure and ISA-tab meta information.
- 4 Running the Sea-snap pipeline.
This is done as usual via
./sea-snap sc --slurm c.
- 5 The results are uploaded to SODAR.
Create a landing zone on SODAR with
cubi-tk sodar lz-create.Create a blueprint of which files to upload with
./sea-snap sc l export.Upload the results using the blueprint and
cubi-tk itransfer-results.
- 6 Check whether all files have been uploaded to SODAR correctly.
This can be done via
cubi-tk sea-snap check-irods.
Processing Commands
Hint: Also see the Seasnap single cell pipeline documentation here.
First, you can pull the meta data from SODAR with the command:
$ cubi-tk sea-snap pull-isa <project_uuid>
This will create a folder with ISA-tab files. Alternatively, you can omit this step and automatically pull the files later.
The next step is to fetch the raw data from SODAR/iRODS.
You first have to authenticate with iRODS using iinit.
Internally, cubi-tk will use the iRODS icommands and you will be shown the commands it is about to execute.
$ iinit
$ cubi-tk sodar pull-raw-data <project_uuid>
Create a working directory for the project results:
$ cubi-tk sea-snap working-dir <path_to_seasnap_pipeline>
This will also copy relevant files and a config template into the new directory. Edit the config files to adjust the pipeline execution to your needs.
Create a sample info file. This is equivalent to a sample sheet and summarizes information about the samples in yaml format. A path pattern to the downloaded FASTQ files is needed, see Sea-snap doku: https://cubi-gitlab.bihealth.org/CUBI/Pipelines/sea-snap/blob/master/documentation/prepare_input.md#fastq-files-folder-structure
$ cubi-tk sea-snap write-sample-info --isa-assay <path_to_assay_file> <path_pattern_to_fastq>
This combines information from both the FASTQ folder structure (given via path pattern) and the ISA-tab meta data (given via ISA-assay file).
If ISA-tab files have not been downloaded yet, you can use the option --project-uuid <project_uuid> instead of --isa-assay to download them on-the-fly.
Now you can start the processing. Run the Sea-snap pipeline as usual:
$ ./sea-snap sc --slurm c <any snakemake options>
$ ./sea-snap sc --slurm c export
After the pipeline has finished, you can create a new landing zone with the following command.
This will print the landing zone properties as JSON.
You will need the landing zone UUID (ZONE) in the next step.
$ cubi-tk sodar landing-zone-create <project_uuid>
You can then transfer the data using the following commands. You will have to specify the blueprint file generated by the export rule of sea-snap.
$ cubi-tk sea-snap itransfer-results <blueprint_file> <landing_zone_uuid>
Finally, you can validate and move the landing zone to get the data into SODAR:
$ cubi-tk sodar landing-zone-move <landing_zone_uuid>
You may check, whether everything was uploaded correctly using the following command:
$ cubi-tk sea-snap check-irods <path_to_local_results_folder> <irods_path_to_results_on_sodar>